
How to Create Custom Automations in monday.com
Overview
Custom automations in monday.com allow you to build personalized workflows tailored to your unique needs. Rather than relying solely on pre-built automation recipes, you can define your own triggers, conditions, and actions to streamline processes across your workspace.
This article walks you through creating custom automations step-by-step, with examples and best practices to help you maximize productivity.
What Are Custom Automations?
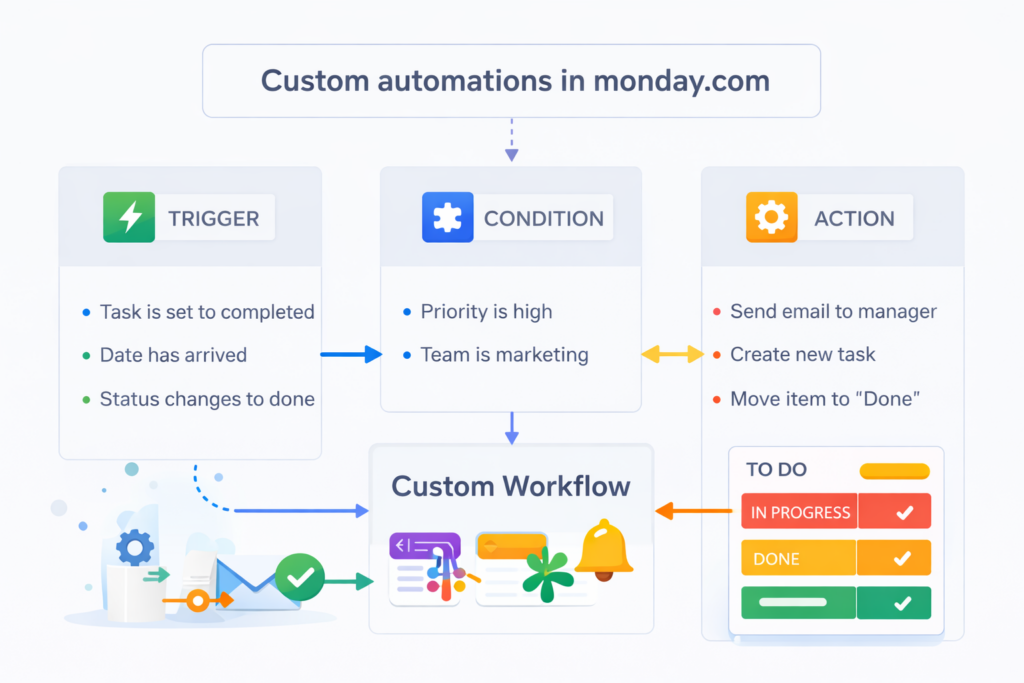
A custom automation is a rule-based workflow that follows the format:
When something happens, and only if certain conditions are met, then do something else.
These automations go beyond standard recipes, allowing you to customize logic specific to your team or process.
How to Create a Custom Automation?
Step 1: Open the Automation Center
- Go to your monday.com board.
- Click “Automate” (top-right corner).
- Select “Create Custom Automation.”
Step 2: Choose a Trigger
The trigger is the event that starts the automation.
Common triggers include:
- When a status changes
- When a date arrives
- When an item is created
- Every time period (daily/weekly)
- When a subitem is updated
Example: “When status changes to Done…”
Step 3: Set Conditions (Optional)
Conditions are optional but allow you to fine-tune your automation.
Examples:
- Only if Priority = High
- Only if Person is assigned
- Only if Status is not “Blocked”
Example: “…and only if Priority is High…”
Step 4: Define the Action
The action is what happens when the trigger (and conditions) are met.
Common actions include:
- Move item to group
- Change column value
- Create a new item
- Notify someone
- Assign a person
- Archive or delete an item
Example: “…then notify the manager and move the item to the Done group.”
Step 5: Save and Activate
- Click “Create Automation”
- It will immediately appear in your board’s automation list
- Test the automation with sample data
Tip: Start small and test before scaling to avoid unexpected behavior.
Examples of Custom Automations
| Use Case | Custom Automation Rule |
|---|---|
| Task Completion | When status changes to Done, move item to Completed group |
| Escalation Trigger | When date arrives and Status is not Done, notify Team Lead |
| Auto Assignment | When item is created and Type is Bug, assign to Dev Team |
| Daily Reminder | Every day at 9AM, notify “@Team” about uncompleted items |
| Subitem Completion Tracker | When all subitems are done, change parent status to Done |
Advanced Tips
- Use multiple actions in one automation (e.g., notify + move + update).
- Combine with board filters to keep visual workflows clean.
- Use dynamic placeholders like
{item.name}or{column value}in messages. - Combine with integrations (e.g., Slack, Gmail) for external actions.
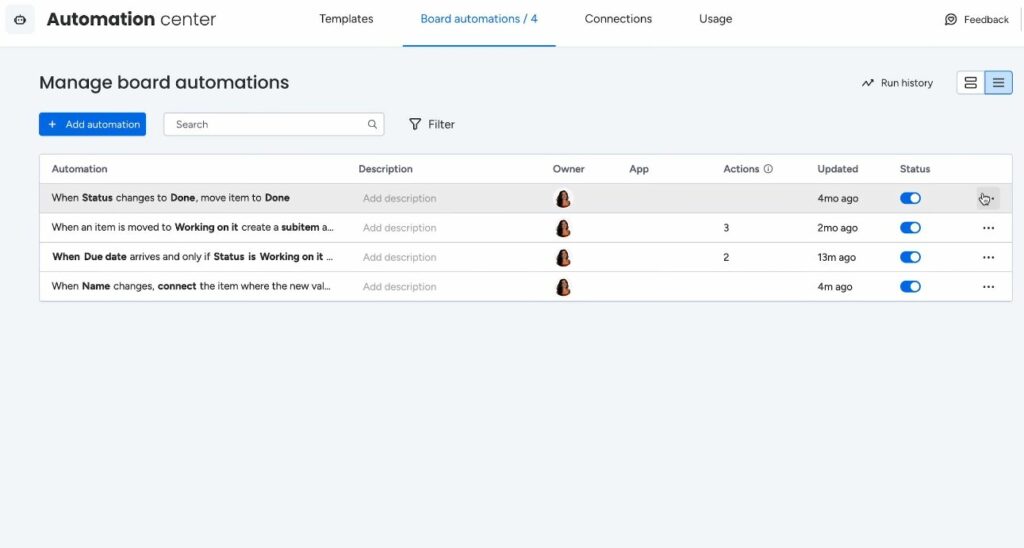
Editing or Deleting a Custom Automation
- Click “Automate” on your board.
- Navigate to the “Board Automations” tab.
- Locate the automation and click the three-dot menu (⋮).
- Select Edit, Deactivate, or Delete.
Best Practices
- Label your automations clearly to understand their function at a glance.
- Group related automations for consistency (e.g., Task Automations, Alert Automations).
- Avoid conflicting automations that may trigger each other in loops.
- Periodically review and clean up outdated automations.
Common Use Cases by Team
| Team | Use Case Example |
|---|---|
| Marketing | Auto-notify content creators when status = Ready |
| Sales | Auto-assign leads based on region |
| HR | Send onboarding tasks when employee is added |
| IT / Dev | Auto-create bug tickets based on form submissions |
Custom automations in monday.com are user-defined rules that automatically execute specific actions when predetermined conditions are met. Essentially, these automations follow an “if-this-then-that” logic, allowing teams to create sophisticated workflows without technical expertise. Furthermore, the platform offers over 200 pre-built automation recipes alongside the flexibility to design completely custom solutions.
The automation engine monitors your boards continuously, triggering actions instantly when conditions align. For instance, when a status changes to “Complete,” the system can automatically notify stakeholders, move items to different boards, or update related fields. Consequently, teams save countless hours previously spent on manual data entry and routine communications.
Additionally, monday.com automations support multi-step sequences, conditional logic, and time-based triggers. This versatility enables organizations to automate everything from simple status updates to complex approval workflows spanning multiple departments. Meanwhile, the visual automation builder makes it easy to understand and modify workflows at any time.
How Does monday.com CRM Relate to Custom Automations?
monday.com CRM seamlessly integrates custom automations to revolutionize sales pipeline management and customer relationship workflows. Specifically, the CRM functionality leverages automation capabilities to nurture leads, track communications, and maintain data consistency across your sales organization.
Through monday.com CRM, sales teams can automate lead assignment based on territory or deal value, ensuring prospects receive immediate attention. Additionally, automated follow-up reminders prevent opportunities from slipping through the cracks. As deals progress through pipeline stages, the system can automatically update forecasts, notify managers, and trigger personalized email sequences.
Moreover, monday.com CRM automations facilitate cross-functional collaboration by syncing customer data with project management, marketing, and support teams. When a deal closes, automations can instantly create onboarding projects, assign tasks to implementation teams, and update revenue dashboards. Therefore, the entire customer journey benefits from reduced friction and improved coordination.
Furthermore, reporting automations in monday.com CRM ensure stakeholders receive timely insights without manual report generation. Weekly pipeline summaries, monthly revenue updates, and activity tracking reports can be automatically compiled and distributed. Consequently, leadership maintains visibility while sales representatives focus on revenue-generating activities.
Why Should You Use Custom Automations in monday.com?
What Business Problems Do Custom Automations Solve?
Custom automations in monday.com address numerous operational challenges that plague modern organizations. Primarily, they eliminate human error in repetitive tasks, ensuring data accuracy and process consistency. When team members manually update statuses, copy information, or send notifications, mistakes inevitably occur. However, automated processes execute flawlessly every time.
Additionally, automations dramatically reduce time spent on administrative overhead. Research indicates that knowledge workers spend approximately 60% of their time on work coordination rather than skilled work itself. By automating routine communications, data transfers, and status updates, monday.com helps teams reclaim these hours for strategic activities.
Furthermore, custom automations enhance accountability and transparency across projects. Automated notifications ensure stakeholders receive timely updates about deadlines, blockers, and completed deliverables. Meanwhile, automated status changes create audit trails that document project progression. Therefore, managers gain unprecedented visibility without micromanaging their teams.
How Do Automations Improve Team Productivity?
Automations boost team productivity through several interconnected mechanisms. First, they accelerate response times by eliminating delays inherent in manual processes. When a customer submits a request, automated assignment and notification ensure immediate action rather than waiting for someone to notice.
Second, automations reduce context switching and interruptions that fragment focus time. Instead of constantly checking for updates or manually updating statuses, team members receive relevant notifications only when their attention is required. Consequently, they maintain deeper concentration on complex tasks that demand cognitive resources.
Third, automated workflows standardize processes across teams, reducing confusion about procedures and hand-offs. New team members can follow established automation sequences without extensive training. Moreover, process improvements can be implemented universally by modifying automations rather than re-training individuals.
What Are the Prerequisites for Creating Custom Automations?
What Access Levels Do You Need?
To create custom automations in monday.com, users require specific permission levels depending on the board structure. Board owners and administrators possess full automation creation and modification privileges by default. However, team members with “member” status can also create automations if board owners grant appropriate permissions.
Additionally, workspace-level automations require workspace admin privileges to create and manage. These higher-level automations affect multiple boards simultaneously and therefore demand elevated permissions. Organizations should establish clear governance policies regarding who can create automations to maintain system integrity.
Furthermore, certain advanced automation features, such as custom integrations and API-based triggers, may require specific plan levels. monday.com offers different tier subscriptions, with premium plans unlocking additional automation capabilities. Therefore, verify your plan includes the automation features your workflows require.
What Should You Prepare Before Building Automations?
Before creating automations, thorough planning ensures successful implementation. First, map your current manual processes to identify automation opportunities. Document each step, decision point, and hand-off in existing workflows. Subsequently, prioritize processes based on frequency, time consumption, and error rates.
Second, standardize your board structure and naming conventions. Automations rely on consistent column types, status labels, and field names to function properly. Inconsistencies across boards create complications when scaling automations organization-wide. Therefore, establish standards before building complex automation sequences.
Third, identify stakeholders who should participate in automation design. The individuals performing manual tasks possess valuable insights about edge cases and exceptions. Meanwhile, process owners understand desired outcomes and success criteria. Consequently, collaborative automation design yields more robust and practical solutions.
How Do You Access the Automation Center?
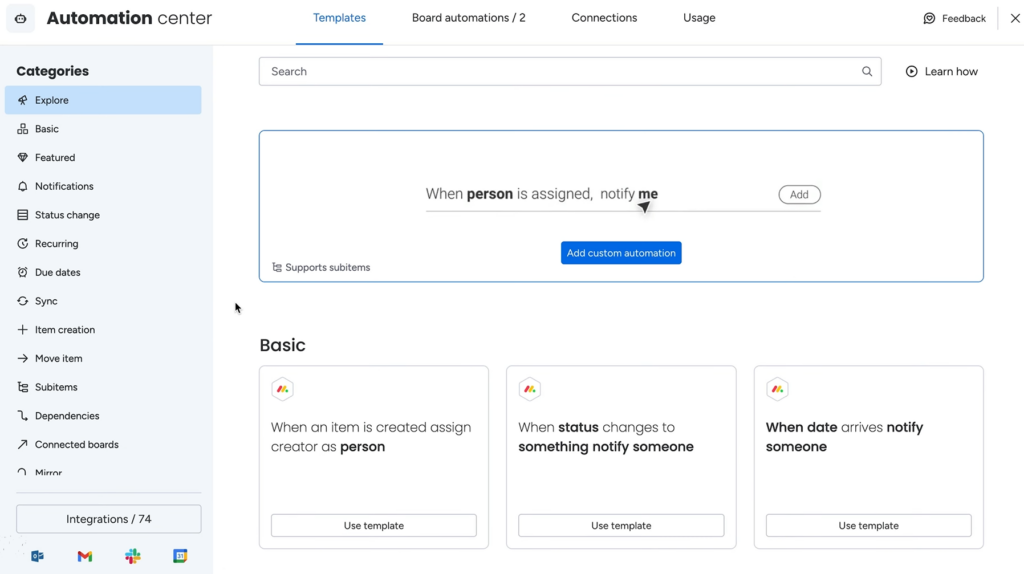
Where Is the Automation Center Located?
The Automation Center serves as the command hub for all monday.com automation activities. To access it, navigate to any board and locate the automation icon in the top-right toolbar. This lightning bolt icon provides immediate access to the automation creation interface. Alternatively, click on your board’s menu and select “Automations” from the dropdown options.
Once opened, the Automation Center displays three primary sections. The “Recipes” tab showcases pre-built automation templates organized by category. The “Custom” tab allows you to build automations from scratch using the visual builder. Finally, the “Integrations” tab manages connections with external applications and services.
Moreover, the Automation Center indicates your current automation usage against your plan limits. monday.com plans include specific automation allocations, and the interface displays remaining capacity. Therefore, monitor usage to ensure critical automations continue functioning without interruption.
What Interface Elements Should You Understand?
The automation builder interface features several key components that streamline creation. The trigger section defines “when” the automation executes, while the action section specifies “what” happens. Between these sections, you’ll find condition filters that add sophisticated logic to determine whether actions should proceed.
Additionally, the interface includes a preview pane showing how your automation sentence reads in plain language. This human-readable format helps non-technical users verify automation logic before activation. Furthermore, the test button allows you to simulate automation execution without affecting actual board data.
The automation library appears on the left side, displaying available triggers, conditions, and actions. These building blocks can be dragged into your automation workflow or selected through dropdown menus. Meanwhile, the right panel provides configuration options for each selected component, including field mappings and custom text.
What Types of Triggers Can You Use?
How Do Status-Based Triggers Work?
Status-based triggers activate when item statuses change to specified values. These versatile triggers form the foundation of many automation workflows because status changes signal progression through defined stages. For instance, when a task moves from “In Progress” to “Complete,” multiple subsequent actions can trigger automatically.
monday.com supports several status trigger variations. “When status changes to something” activates whenever any item reaches the specified status. Meanwhile, “When status changes from something to something” provides greater specificity by requiring both a starting and ending status. Additionally, you can combine status triggers with conditions to create nuanced automation logic.
Furthermore, status triggers can monitor multiple statuses simultaneously using “or” logic. For example, you might trigger actions when status becomes either “Complete” or “Delivered” without creating separate automations. Therefore, status-based triggers offer flexibility while maintaining simplicity.
What Are Time-Based Trigger Options?
Time-based triggers execute automations according to temporal conditions rather than user actions. These powerful triggers enable proactive management rather than reactive responses. The most common time trigger activates “When date arrives,” monitoring date columns and executing actions when specific dates occur.
Additionally, relative time triggers provide anticipatory capabilities. “When date arrives and it is X days before/after” allows automations to execute in advance of deadlines or following completion dates. For instance, send reminder notifications three days before project deadlines to ensure teams stay on schedule.
Moreover, recurring time triggers enable periodic automation execution. “Every time period” triggers actions on daily, weekly, or monthly schedules regardless of item changes. These recurring automations excel at generating reports, checking for stale items, or sending regular status updates. Consequently, teams maintain rhythm and consistency in their operations.
Can You Use Column Value Changes as Triggers?
Column value change triggers offer granular control over automation execution. “When column changes” activates whenever any value modification occurs in specified columns, regardless of the new value. This trigger proves valuable for audit trails and notification systems that respond to any data updates.
Furthermore, “When column changes to something” adds specificity by requiring particular values. For example, trigger actions only when priority changes to “High” rather than any priority modification. This precision prevents unnecessary automation executions and notification fatigue.
Additionally, monday.com supports triggers for specific column types including numbers, dates, people, and custom fields. “When numbers change” can trigger budget recalculations, while “When person changes” can notify new assignees. Therefore, your automation vocabulary expands significantly by leveraging column-specific triggers.
How Do You Configure Automation Actions?
What Notification Options Are Available?
Notification actions represent the most frequently used automation responses. “Notify someone” sends messages to specified team members, ensuring critical information reaches appropriate stakeholders promptly. You can select individuals, entire teams, or dynamic references like “the person in the assigned column.”
Additionally, notification customization enhances communication effectiveness. Custom notification text can include item details, column values, and board information using placeholder syntax. For example: “Task [item name] assigned to [person column] is due in [date column].” Consequently, recipients receive contextual information without accessing the board.
Furthermore, notification channels extend beyond monday.com’s internal messaging. Email notifications reach team members regardless of platform usage, while mobile push notifications ensure immediate visibility. Meanwhile, integration with communication tools like Slack or Microsoft Teams broadcasts notifications where teams already collaborate. Therefore, notifications meet people where they work.
How Do You Automate Status and Column Updates?
Automated status updates eliminate manual board maintenance and ensure data consistency. “Change status to something” modifies item statuses based on trigger conditions. For instance, automatically change status to “Approved” when a manager responds positively to an approval request.
Column update actions extend beyond status modifications. “Change column value” can update any editable column type including text, numbers, dates, and people fields. Combined with formulas and conditional logic, these updates create sophisticated data management workflows. For example, automatically calculate and update project completion percentages based on subtask statuses.
Moreover, multi-column updates execute simultaneously through single automations. Rather than creating separate automations for each field, configure one trigger with multiple update actions. This approach maintains performance while ensuring atomic updates—all changes occur together or none occur at all. Consequently, your boards remain consistent and reliable.
What Item Creation and Movement Actions Exist?
Item creation actions generate new board items automatically based on trigger conditions. “Create an item” spawns new tasks, projects, or records in specified boards, optionally inheriting column values from the triggering item. For instance, when deals close, automatically create onboarding project items in your implementation board.
Additionally, item duplication actions clone existing items with all associated data. “Duplicate item” creates copies within the same board or across different boards, preserving column values, updates, and file attachments. This capability streamlines template-based workflows where similar items require consistent starting points.
Furthermore, item movement actions organize boards dynamically. “Move item to group” relocates items between board sections based on status, priority, or other criteria. Meanwhile, “Move item to board” transfers items across separate boards, creating powerful routing workflows. For example, escalate high-priority support tickets from triage boards to specialized resolution boards automatically.
How Can You Add Conditions to Automations?
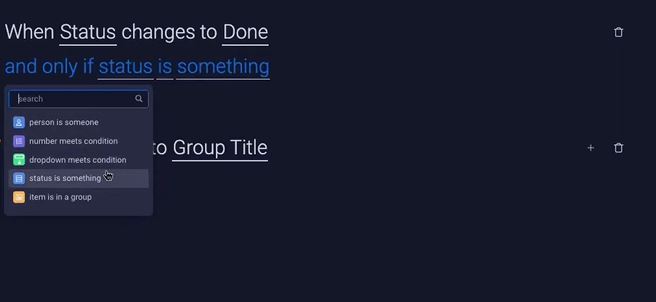
What Are Conditional Logic Options?
Conditional logic transforms simple automations into intelligent decision-making systems. The “Only if” condition adds filters that must evaluate true before actions execute. For instance, notify managers only if overdue tasks also have high priority, preventing notification overload from minor delays.
monday.com supports multiple condition types including status checks, column value comparisons, and date evaluations. “Only if status is something” verifies current status before proceeding, while “Only if column equals/contains something” checks text, number, or selection fields. Additionally, date conditions like “Only if date is within X days” enable time-sensitive logic.
Furthermore, compound conditions combine multiple criteria using “and” logic. All specified conditions must be true for actions to execute. For example, trigger escalation only if status is “Stuck” AND priority is “High” AND assigned person is empty. Consequently, automations respond precisely to complex scenarios.
How Do You Create Multi-Condition Automations?
Multi-condition automations implement sophisticated business logic within single workflows. To create them, add multiple “Only if” statements after defining your trigger. Each condition acts as a gate that must open before proceeding to actions. Therefore, carefully order conditions to reflect your decision-making priorities.
Consider a practical approval workflow example. Trigger when status changes to “Ready for Review.” Add condition one: “Only if budget column is greater than $10,000.” Add condition two: “Only if department is Sales.” Add condition three: “Only if assigned to someone.” If all conditions pass, notify the CFO for approval. Otherwise, the automation remains dormant.
Moreover, strategic condition placement optimizes automation performance. Place the most restrictive conditions first to eliminate unnecessary evaluations. If 90% of items fail the first condition, subsequent conditions never evaluate, improving system efficiency. Additionally, clearly document complex multi-condition automations to facilitate future maintenance and troubleshooting.
What Are Advanced Automation Techniques?
How Do You Create Automation Sequences?
Automation sequences chain multiple related automations to create sophisticated multi-step workflows. While individual automations follow single trigger-action patterns, sequences coordinate several automations that fire in succession. Plan sequences by mapping each workflow stage and identifying appropriate triggers that connect steps.
For example, consider a content approval workflow. Automation one: When status changes to “Draft Complete,” notify the editor and change status to “In Review.” Automation two: When status changes to “In Review,” create a due date five days in the future. Automation three: When the editor changes status to “Approved,” notify the publisher and move the item to the publishing board. Together, these automations orchestrate a complete process.
Additionally, ensure sequences handle exceptions and alternative paths. What happens if editors reject content? Create branching automations that respond to different outcomes. When status changes to “Needs Revision,” notify the original author and reset the due date. Therefore, comprehensive sequences account for the full spectrum of possible scenarios.
Can You Integrate External Applications?
Integration automations connect monday.com with external platforms, creating powerful cross-system workflows. The Integrations section offers hundreds of pre-built connectors for popular tools including Gmail, Slack, Zoom, Salesforce, and Google Drive. These integrations enable data synchronization and action triggering across your entire technology ecosystem.
Setting up integrations requires authentication with external services. Click the desired integration, grant necessary permissions, and configure field mappings between systems. For instance, connect Gmail to automatically create board items from incoming emails with specific labels. Alternatively, sync Salesforce leads to monday.com CRM boards automatically.
Furthermore, webhook integrations enable custom connections with virtually any application offering an API. Advanced users can configure webhooks that send data to external systems when specific triggers activate. Conversely, external systems can trigger monday.com automations through incoming webhooks. Consequently, monday.com becomes the central hub coordinating your entire operational infrastructure.
What Are Recurring and Scheduled Automations?
Recurring automations execute on predetermined schedules rather than event-based triggers. “Every time period” automations run daily, weekly, monthly, or at custom intervals, making them perfect for routine maintenance tasks. For example, every Monday morning, send weekly priority summaries to department heads automatically.
Additionally, recurring automations can check for specific conditions and take action when found. “Every day, if status is something, then do something” combines periodic execution with conditional logic. Use this pattern to identify and escalate stale items, chase overdue deliverables, or archive completed projects.
Moreover, time-of-day specification ensures automations execute during appropriate hours. Configure report generation for early morning before team arrival, or schedule reminder notifications during working hours only. Weekend and holiday exclusions prevent unnecessary noise during non-business times. Therefore, recurring automations respect your organization’s rhythm and culture.
How Do You Organize and Manage Your Automations?
What Naming Conventions Should You Follow?
Effective naming conventions transform automation libraries from confusing lists into organized, navigable resources. Descriptive names should clearly indicate what triggers the automation and what actions occur. For example, “Status Complete → Notify PM & Archive” immediately communicates both trigger and outcome.
Additionally, consider implementing prefixes that categorize automations by function or department. “NOTIF: Overdue Task Alerts,” “STATUS: Auto-Archive Completed,” and “CREATE: Duplicate Monthly Reports” create visual groupings. Subsequently, team members locate relevant automations quickly when troubleshooting or making modifications.
Furthermore, include version numbers or dates for automations that undergo frequent updates. “Lead Assignment v2.3” or “Invoice Processing (Updated Jan 2025)” maintains historical context. When replacing outdated automations, archive rather than delete them to preserve organizational knowledge. Therefore, your automation library serves as institutional memory.
How Can You Test Automations Before Activation?
Testing automations before activation prevents unintended consequences and validates logical accuracy. monday.com’s preview mode allows you to review automation configuration without executing actions. The plain-language automation sentence reveals whether your configuration matches intentions.
Additionally, create dedicated test boards that mirror production structures for safe experimentation. Configure automations in test environments, then trigger them manually by modifying item properties. Observe whether actions execute as expected, notifications contain proper information, and conditions filter appropriately. Consequently, you identify issues before they affect operational boards.
Furthermore, implement gradual rollouts for organization-wide automations. Initially activate automations on pilot boards or specific groups rather than entire boards. Monitor performance, gather user feedback, and refine configurations. After validation, extend automations to additional boards systematically. This measured approach minimizes disruption while ensuring automation reliability.
What Are Common Automation Use Cases?
How Do You Automate Project Management Tasks?
Project management automations streamline coordination and enhance visibility across initiatives. Task assignment automations distribute work automatically based on workload, expertise, or availability. When new items are created, intelligent routing ensures balanced distribution and immediate assignment clarity.
Additionally, deadline management automations prevent schedule slippage through proactive notifications. Remind task owners three days before due dates, escalate overdue items to project managers, and automatically extend timelines when dependencies shift. Furthermore, milestone celebration automations acknowledge team achievements, fostering positive culture. When project phases complete, automatically send congratulatory messages and update stakeholder dashboards.
Moreover, resource allocation automations optimize team utilization. When individuals reach capacity, automatically reroute new assignments to available team members. Track time estimates against actuals, flagging projects that exceed budgets for management review. Therefore, project management becomes proactive rather than reactive.
What Sales and CRM Automations Are Most Valuable?
Sales automations in monday.com CRM accelerate pipeline velocity and improve conversion rates. Lead assignment automations instantly route incoming prospects to appropriate sales representatives based on territory, product interest, or deal size. Consequently, response times decrease dramatically, improving initial customer impressions.
Additionally, follow-up automations ensure consistent communication throughout sales cycles. Automatically schedule follow-up activities three days after initial contact, send reminder notifications when follow-ups approach, and escalate cold leads for re-engagement campaigns. Furthermore, deal progression automations update forecasts and notify managers when opportunities advance through pipeline stages.
Moreover, post-sale automations facilitate smooth customer onboarding. When deals close, automatically create implementation projects, assign onboarding specialists, and send welcome communications to new customers. Invoice generation, contract storage, and success team hand-offs all proceed automatically. Therefore, the customer experience remains seamless despite internal complexity.
Can You Automate HR and Team Management?
HR and team management automations reduce administrative burden while improving employee experiences. Onboarding automations create comprehensive checklists when new employees join, automatically assigning tasks to IT, facilities, and hiring managers. Equipment provisioning, system access requests, and training scheduling proceed systematically without manual coordination.
Additionally, time-off management automations streamline approval workflows. When employees submit vacation requests, automatically notify managers and update team capacity planning. Upon approval, block out calendars, notify team members, and adjust project timelines to accommodate absences. Furthermore, rejection notifications include explanations and suggest alternative dates.
Moreover, performance review automations ensure consistent evaluation cycles. Quarterly, automatically create review items for each employee, notify managers of upcoming deadlines, and compile peer feedback. Reminder escalations prevent delayed reviews, while completion notifications trigger salary adjustment workflows. Therefore, HR processes maintain consistency across the organization.
What Automation Limitations Should You Know?
What Are the Automation Quota Limits?
monday.com plans include specific automation quotas that vary by subscription tier. Basic plans typically include several thousand automation actions monthly, while enterprise plans offer substantially higher allocations. Each automation execution counts as one action against your quota, regardless of complexity.
Additionally, monitor usage patterns to avoid unexpected quota exhaustion. The Automation Center displays current usage statistics and projected consumption based on historical patterns. When approaching limits, prioritize critical automations and optimize inefficient workflows. Furthermore, consider upgrading plans if automation has become central to operations.
Moreover, certain integrations and actions may consume multiple quota units per execution. Complex API calls, external service integrations, and batch operations sometimes count differently than simple notifications. Therefore, review automation efficiency regularly and consolidate redundant workflows to maximize available quota.
What Actions Cannot Be Automated?
Despite monday.com’s extensive automation capabilities, certain actions remain manual by design. Board structure modifications like adding columns, changing column types, or creating new groups cannot be automated. These architectural changes require human decision-making and intentionality to maintain system integrity.
Additionally, some administrative functions like user permission changes, workspace restructuring, and plan downgrades must be executed manually. These safeguards prevent accidental system alterations that could disrupt operations. Furthermore, file uploads and attachment modifications cannot be fully automated through standard automation builders, though API integrations may enable workarounds.
Moreover, complex calculations requiring external data sources or sophisticated logic may exceed automation builder capabilities. While formulas handle many scenarios, some analytical requirements necessitate custom code or third-party integrations. Therefore, understand automation boundaries and identify where manual processes or custom development become necessary.
How Do You Troubleshoot Automation Issues?
Why Is My Automation Not Triggering?
Non-triggering automations typically stem from a few common issues. First, verify trigger conditions actually occur in your workflow. If your automation triggers “when status changes to Complete” but items never reach that status, the automation remains dormant. Review board activity to confirm trigger events happen as expected.
Second, examine condition filters that may prevent execution. Even when triggers activate, “Only if” conditions might evaluate false, blocking actions. Test automations by temporarily removing conditions to isolate the problem. Additionally, check that column references in conditions still exist and contain expected data formats.
Third, confirm the automation remains active and hasn’t been inadvertently disabled. The Automation Center displays activation status for each automation. Furthermore, verify you haven’t exceeded automation quotas, which would disable automations until the next billing cycle. Therefore, systematic diagnosis identifies issues efficiently.
What Causes Incorrect Automation Behavior?
Incorrect automation behavior often results from ambiguous configurations or changed board structures. When automations reference columns by name, renaming those columns breaks the connection. Similarly, status label modifications disrupt status-based triggers. Consequently, maintain consistency in board structures to preserve automation functionality.
Additionally, timing issues create unexpected behavior. Multiple automations triggering simultaneously may execute in unpredictable sequences, causing race conditions. For instance, one automation updates a status while another reads that same status—execution order determines outcomes. Therefore, design automation sequences carefully and test timing dependencies thoroughly.
Furthermore, notification fatigue indicates overly aggressive automation configurations. If team members receive dozens of notifications daily, they’ll ignore important messages. Review automation frequency, consolidate redundant notifications, and implement condition filters that reduce noise. Well-designed automations inform without overwhelming.
How Do You Get Help With Complex Automation Issues?
When troubleshooting proves challenging, multiple support resources provide assistance. monday.com‘s help center contains extensive automation documentation, video tutorials, and troubleshooting guides. Additionally, the community forum connects you with experienced users who’ve solved similar challenges. Search existing discussions or post detailed questions describing your automation requirements.
Furthermore, monday.com’s customer support team assists with technical issues and advanced configurations. Premium plan subscribers receive priority support with faster response times. When contacting support, provide automation screenshots, board structures, and specific error messages to accelerate resolution.
Moreover, consider consulting certified monday.com partners for complex automation implementations. These experts design enterprise-grade workflows, integrate custom solutions, and optimize system performance. While consulting involves costs, professional guidance accelerates deployment and ensures best practices. Therefore, evaluate whether external expertise provides valuable returns on investment.
What Best Practices Ensure Automation Success?
How Should You Plan Automation Rollouts?
Successful automation rollouts follow structured planning and gradual implementation. Begin by documenting current manual processes in detail, identifying pain points and inefficiencies. Interview team members performing tasks to understand nuances and edge cases. Subsequently, prioritize automation opportunities based on impact, feasibility, and organizational readiness.
Additionally, start with simple, high-value automations that deliver immediate benefits and build confidence. Early wins create organizational momentum and demonstrate automation value to skeptics. After establishing foundational automations, incrementally add complexity and sophistication. This measured approach allows teams to adapt gradually rather than facing overwhelming changes.
Furthermore, establish governance frameworks that define automation ownership, approval processes, and modification protocols. Without governance, automation libraries become cluttered with redundant, conflicting, or obsolete workflows. Designate automation champions within departments who coordinate implementations and maintain documentation. Therefore, systematic planning prevents chaos as automation adoption scales.
What Documentation Should You Maintain?
Comprehensive documentation ensures automation sustainability and knowledge transfer. Create automation inventories that list each workflow with descriptions, trigger conditions, actions, and business purposes. Include creation dates, authors, and modification history to track evolution. Subsequently, new team members understand the automation ecosystem without reverse-engineering individual workflows.
Additionally, document dependencies between related automations that form sequences or interact with common data. Dependency mapping reveals how changing one automation might affect others, preventing unintended consequences. Furthermore, note external integrations and their configuration requirements to facilitate troubleshooting when connections break.
Moreover, maintain runbooks that explain how to modify, test, and deploy automation updates. Include screenshots, step-by-step procedures, and rollback instructions. When automation owners leave organizations or change roles, successors can maintain systems without extensive transition periods. Therefore, documentation transforms automations from black boxes into transparent, maintainable assets.
How Do You Balance Automation and Human Oversight?
Optimal automation strategies complement human judgment rather than replacing it entirely. Automate routine, rules-based tasks where consistency and speed provide value. However, preserve human decision-making for ambiguous situations requiring context, empathy, or creativity. For instance, automate routine status updates but require human approval for budget exceptions.
Additionally, implement exception handling that escalates unusual situations to people. When automations encounter undefined scenarios, create notifications that request human intervention. This safety valve prevents automations from making inappropriate decisions in edge cases. Furthermore, regular automation audits identify opportunities to refine rules based on observed exceptions.
Moreover, maintain transparency about automation existence and function. Team members should understand which processes run automatically versus requiring their action. Hidden automations create confusion and undermine trust when unexpected behaviors occur. Therefore, foster automation literacy through training and visible documentation that demystifies automated workflows.
Frequently Asked Questions
Custom automations in monday.com are rule-based workflows that automatically perform actions when specific triggers occur. For example, you can automatically assign tasks, send notifications, update statuses, or create new items when conditions are met. They help reduce manual work, improve consistency, and streamline processes across teams.
No, monday.com provides a no-code automation builder with a visual interface. You can create automations by selecting triggers and actions from predefined recipes or customizing them to match your workflow. This makes automation accessible even for non-technical users.
Popular use cases include task assignment when a project starts, deadline reminders, status updates based on progress, notifications to stakeholders, CRM pipeline updates, and integration with external tools like email or messaging platforms. Automations can be applied to project management, sales, HR, and operations workflows.
Yes, monday.com supports integrations with many third-party platforms such as email services, collaboration tools, CRMs, and file storage systems. By combining integrations with automations, you can create cross-platform workflows that keep your data synchronized and your teams aligned.
Need Help?
If you’re not sure how to design the right custom automation or need help troubleshooting, reach out to your workspace admin or contact monday.com support.
Recommended:
- How Should You Structure Your CRM Team for Maximum Success?
- Using Salesforce to Build a 360° Customer View
- What Should Investors Know About Salesforce Stock?
- What KPIs Should Every Business Track in Their CRM System?
- What is CRM Database?
- How Can CRM Analytics Transform Your Salesforce Experience?
- CRM Management
- Getting Started With Pipedrive
- What is Pipedrive CRM?
- Choosing the best low-cost CRM
- Top Microsoft Dynamics Alternatives and Competitors
- CRM Cost Comparison of Top Platforms
